
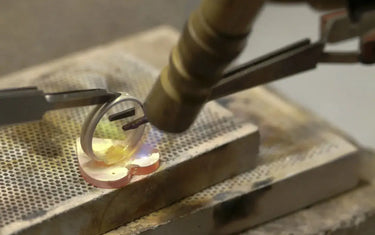
Mastering soldering jewelry is the ultimate milestone that elevates hobbyists to professional artisans. While working with a high-heat torch can feel intimidating, this beginner-friendly guide starts entirely from scratch. We will show you how to set up a budget-friendly workspace, select the right tools, and safely execute your very first solder joint with absolute confidence.
I. Core Principles: The "Golden Rules" You Must Know Before Soldering
Before you ignite your torch, it is crucial to understand what actually happens during the process. In jewelry making, we generally use hard soldering (often called brazing).
Unlike soft soldering—which uses a soldering iron and low-temperature lead/tin alloys for electronics—jewelry soldering involves using high-temperature silver or gold alloys to create strong, seamless structural joins.
The most critical concept to grasp is this: You are not melting your jewelry pieces. Instead, you are heating the base metal to a specific temperature so that a tiny piece of filler metal (solder) melts, flows, and bonds the parts together.
To achieve a perfect bond every time, you must memorize two non-negotiable rules:

Golden Rule 1: Absolute Cleanliness and Perfect Fit
Solder is incredibly picky. It refuses to bridge gaps or flow over dirt.
- The Fit (Light-Tight): The two pieces of metal you want to join must touch perfectly. If you hold your joint up to the light and see any light shining through the seam, the gap is too wide. Solder cannot fill a void; it draws together through capillary action. File your joints until they match perfectly.
- The Cleanliness: Metal must be completely free of skin oils, polishing compounds, and oxidation. Even touching the metal with your fingers after cleaning can transfer enough oil to ruin a solder joint.
Golden Rule 2: Solder Follows Heat (Heat Direction)
One of the most common beginner mistakes is aiming the torch flame directly at the solder chip. Doing this will simply melt the solder into an useless ball before the jewelry piece is hot enough to receive it.
The Heat Principle: Solder will always flow toward the hottest spot on the metal. You must heat the surrounding base metal evenly. Once the base metal reaches the flow point temperature, it will naturally draw the solder through the seam.
II. Essential Checklist for Beginners: Cost-Effective Tools and Materials
You do not need a massive industrial setup to begin. A highly effective, professional-grade jewelry bench can be assembled on a modest budget.
|
Tool Name |
Purpose |
Beginner Recommendation |
|
Provides the high heat needed for soldering |
Opt for a portable butane torch. It is inexpensive, safe, refillable, and provides more than enough heat for small silver and copper projects. |
|
|
The alloy medium that melts to join metals |
Keep sterling silver or brass solder wire/sheet on hand. Start with both "Easy" (lower melting point) and "Medium" (higher melting point) grades. |
|
|
Flux |
Prevents oxidation at high heat and guides solder flow |
Use liquid or paste flux. It keeps the metal clean during heating and acts as a temperature indicator. Pair it with a small, natural-bristle brush. |
|
A highly heat-resistant surface for your workbench |
A honeycomb ceramic soldering board is ideal. It reflects heat back onto your piece and allows you to use pins to hold work in place. |
|
|
Tweezers |
Handling hot metal or placing tiny solder chips |
Buy a pair of cross-locking tweezers with heat-resistant fiber grips. They hold items automatically without requiring finger pressure. |
|
Pickle Pot |
Removes the dull, black oxidation layer formed during heating |
An inexpensive, small kitchen slow cooker (Crockpot) filled with a food-safe safety acid (Pickle Compound) dissolved in warm water. |
III. Safety First: Setting Up Your Safe Home Studio

Working with fire and acids requires a respectful, structured approach to safety. You do not need a commercial warehouse, but your home studio space must be organized around three critical safety elements:
1. The Ventilation System (Airflow Setup)
Heating metals and flux releases microscopic fumes that should not be inhaled. Never solder in a completely sealed room or closet. Always work in a space with active airflow—at the very least, open a window and position a small fan to blow the fumes away from your face and toward the outside.
2. The Apparel Code (Personal Studio Wear)
- Eye Protection: Wear safety goggles to protect your eyes from accidental flux pops or hot pickle splashes.
- Studio Clothing: Tie back long hair securely. Wear tight-fitting clothing made of natural fibers like 100% cotton. Synthetic fabrics (like polyester or nylon) will melt rapidly onto your skin if they catch a stray spark.
- Footwear: Avoid open-toed shoes or sandals; a dropped piece of hot metal can cause severe burns.
3. The Emergency Station (Safety Equipment)
Keep a ceramic or metal bowl filled with clean water (known as a quench bowl) directly on your workspace. In the event of an emergency, or simply to cool down your metal, this water is your primary safety tool. Additionally, keep an active fire extinguisher or a thoroughly damp heavy rag within arm's reach of your bench.
IV. Step-by-Step Guide: Your First Soldering Project
Let’s put these concepts into practice by soldering a simple sterling silver jump ring or ring band.

Step 1: Preparation & Fit
Use a fine jewelry file to flatten the ends of your wire. Align the ends so they spring against each other with tension, creating a perfectly flush, light-tight joint. Scrub the joint area with a piece of fine sandpaper or a scotch-brite pad to strip away surface dirt.
Step 2: Fluxing
Using your small brush, apply a thin, even coat of flux directly to the joint. Ensure the flux gets inside the seam. The flux will protect the sterling silver from developing "firescale" (deep oxidation) and will help the solder flow smoothly.
Step 3: Placing Solder
Using wire cutters, snip a tiny piece of solder sheet or wire—roughly the size of a grain of rice (about 1mm x 1mm). These tiny pieces are called pallions. Dip the tip of your fluxed brush into the pallion to pick it up, and place it directly on top of, or resting against, the flush joint.

Step 4: Heating & Flowing
Ignite your butane torch and adjust it to a crisp blue flame. Keep the torch moving constantly in a circular motion around the entire piece to preheat the metal evenly.
Watch the flux: first, it will bubble and turn white; then, it will liquefy and become completely clear and glassy. This glass-like stage indicates that the metal is approaching soldering temperature.
Focus the flame’s heat on the metal parts right next to the joint—not on the solder itself. When the metal reaches the correct temperature (around 1200°F / 650°C for easy silver solder), you will see a sudden flash of bright silver. The solder will instantly melt and draw completely into the seam. Remove the torch flame immediately.
Step 5: Quenching & Pickling
Use your cross-locking tweezers to pick up the hot piece of jewelry. Drop it directly into your bowl of quenching water. You will hear a satisfying sizzle as the metal cools instantly to room temperature.
Once quenched, place the piece into your warm pickle pot for 5 to 10 minutes. The mild acid will strip away the glassy flux residue and the dark copper oxides, revealing a clean, matte-white silver finish ready for polishing.
V. Troubleshooting for Beginners: Why Did My Soldering Fail?
Even experienced jewelers experience failed joins. When things go wrong, use this quick diagnostic guide to identify and fix the issue.
Issue A: The solder balls up into a sphere but refuses to flow into the joint.
- The Cause: This is almost always caused by a dirty metal surface, lack of flux, or uneven heating. If the base metal is cold, the solder will melt on its own, surface tension will pull it into a ball, and it will roll away from the seam.
- The Fix: Let the piece cool, pickle it to clean off the oxidation, file the joint clean again, re-apply flux, and focus your torch heat on the surrounding metal rather than the solder.
Issue B: The jewelry metal melts, warps, or gets a cratered texture.
- The Cause: You overheated your piece. This happens when the torch flame is held stationary over one spot for too long without a sweeping, circular movement.
- The Fix: Practice keeping your torch hand in constant motion. Keep the bright blue inner cone of the flame slightly away from the metal, using the warmer outer envelope of the flame to distribute heat evenly.
Issue C: The joint looks soldered, but breaks easily when pulled or filed.
- The Cause: This is known as a cold joint. The solder melted, but the base metal was not hot enough to form an actual molecular bond. Additionally, if the joint fit was not perfectly tight, the solder merely sat on the surface instead of filling the seam through capillary action.
- The Fix: Ensure your joints are physically touching before heating. Do not rely on solder to fill empty space.
Conclusion
The secret to mastering jewelry soldering is patience and consistent practice. Do not start your journey by working on expensive gold sheets or intricate sterling silver bezels. Instead, buy a coil of inexpensive copper or brass wire, cut it into dozens of jump rings, and practice soldering them closed one by one.
As you develop a feel for the torch, you will learn to read the colors of the heating metal—moving from a dull red to a cherry pink—and master the precise moment of solder flow. Once you are comfortable with basic joints, you can confidently move on to advanced fabrication methods, such as sweat soldering flat designs together or setting beautiful cabochon gemstones.
Ready to begin your metalworking journey? Having dependable, high-quality gear makes all the difference in avoiding early frustration. Visit LuxgoldTools to explore our curated selection of jewelry soldering tools, designed to help you succeed from your very first flame.
