
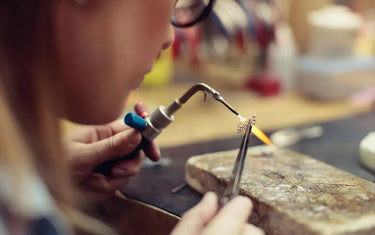
Why does your soldering keep failing—either it balls up without flowing, or you accidentally melt the entire piece? Jewelry soldering isn't a matter of luck or magic; it is a precise scientific process driven by heat, clean surfaces, and capillary action. By strictly following these five golden rules, you can easily eliminate the guesswork and achieve flawless, seamless joints every time.
Rule 1: Thoroughly Clean the Metal Surface Before Soldering

To get a perfect run of solder, you must use a combination of physical abrasion and chemical degreasing. Your goal is to leave absolutely no room for oxides or surface contaminants.
Why It Matters
Solder bonds with the base metal at the molecular level through a process called interdiffusion. Any grease (including natural oils from your fingerprints), dust, polish residue, or old oxide layers will act as a physical barrier. If the metal isn't clean, the molten solder simply cannot alloy with the surface, causing it to ball up and roll away.
Practical Tips
- Physical abrasion: Before you even light your torch, use 400–600 grit sandpaper or a fine steel wire brush to clean the joint. Rub the metal until you expose a bright, scratch-free, matte finish right where the two pieces meet.
- Degreasing and contamination prevention: Wipe the freshly sanded area with isopropyl alcohol to remove any residual oil. From this point on, strictly avoid touching the joint with your bare hands. Use copper tongs or tweezers to handle and position your piece on the soldering block.
Rule 2: Ensure the Joint Fits Perfectly with No Gaps

In jewelry making, solder is not a gap filler. It is designed to flow only through a physical phenomenon known as capillary action.
Why It Matters
A common mistake beginners make is leaving visible gaps in a bezel or ring shank, assuming the solder will fill them like glue or caulking. In reality, once melted, liquid solder behaves like water: it is drawn toward the points of tightest contact and highest heat. If the gap is too wide, the solder will simply retreat to one side of the joint, leaving a hole and causing the structure to fail.
Practical Tips
- The light test: Hold your assembled joint up to a bright light source. If any light shines through the seam, the fit is not tight enough. Use a jeweler’s saw or a hand file to adjust the edges until you have a perfectly flush, metal-on-metal fit.
- Stress-free contact: Ensure the two components fit snugly in their natural, resting state. Do not force or bend them together under tension using binding wire or clamps. If you do, the metal will expand as it heats, causing the joint to spring apart mid-solder.
Rule 3: Apply a Generous Amount of Flux to All Areas to Be Soldered

Flux is your primary defense against high-temperature oxidation and acts as a chemical guide for your solder.
Why It Matters
Metals like copper and silver develop new oxide layers within seconds of being exposed to open flame. Oxygen is the enemy of a clean solder joint. Flux shields the hot metal from air, prevents fire scale, and reduces the surface tension of the molten solder, allowing it to flow smoothly into the tightest seams.
Practical Tips
- Application area: Do not just dab a tiny drop of flux directly on the seam. Apply it generously to the joint itself, the surrounding metal (to prevent local oxidation), and the solder pallions (chips) themselves.
- Observing the state of the flux: As you heat the piece, watch the flux closely. It will transition through three distinct phases:
-
- It will bubble and turn white as the water boils off.
- It will crust over into a white powder.
- Finally, it will melt into a clear, liquid, glass-like state.
Only when the flux is completely transparent and glassy is the metal at the correct temperature for the solder to flow.
Rule 4: Heat the Metal as a Whole, Rather Than Heating the Solder Directly

Solder always flows toward the hottest point on the workpiece. This is known as the principle of thermal attraction.
Why It Matters
Blasting a small piece of solder directly with your torch flame is a guaranteed way to fail. The solder chip will heat up instantly, oxidize, and ball up before the underlying jewelry metal is hot enough to receive it.
Practical Tips
- Preheat the entire piece: Keep your torch flame moving in wide circles to heat the entire jewelry workpiece evenly. Pay special attention to the areas of greater mass or thickness (for example, a thick ring shank needs much more heat than a delicate bezel wire).
- Use the metal's heat to melt the solder: Once the surrounding metal begins to glow a faint, warm red and reaches soldering temperature, briefly direct your torch flame right over the joint. Let the heat conducted by the base metal melt the solder from underneath. It will instantly liquefy and pull directly into the seam like water.
Rule 5: Monitor Metal Color Changes and Cut the Heat Instantly

Soldering requires active observation. You must learn to recognize subtle temperature cues to prevent your jewelry from melting or deforming.
Why It Matters
The melting points of common jewelry metals (like sterling silver, brass, or various karats of gold) are often only a few dozen degrees higher than the flow point of the solder itself. Heating your piece for even a single second too long can cross that threshold, causing your entire design to collapse into an unsalvageable blob.
Practical Tips
- Work in dim light: Bright overhead studio lights wash out the subtle color changes of hot metal. Dim your workspace lighting slightly so you can clearly see the metal's glow.
- Timing the heat removal: Watch for the metal to reach a dull cherry red glow. The exact moment you see the solder liquefy and flash into a bright silver line along the seam, you must pull the torch flame away within one second.
Summary
Successful soldering is all about system and sequence. Use this simple five-step checklist every time you light your torch:
1. Clean: Sand and degrease your metal surfaces.
2. Fit: Ensure your joints are flush with zero visible gaps.
3. Apply: Protect the entire area with a high-quality flux.
4. Control Heat: Heat the body of the piece, not the solder chip.
5. Withdraw: Remove the flame the instant the solder flows.
By mastering these fundamentals, you eliminate the guesswork from your bench work. Ready to upgrade your studio setup? Purchase professional jewelry soldering tools at LuxgoldTools to ensure your heat delivery, pickling, and joint prep are handled with industry-grade precision.
