
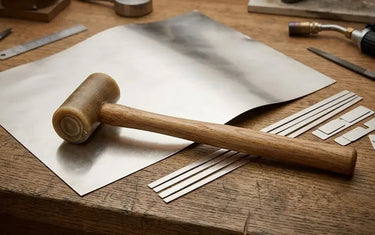
When working with metal sheets or wire, fixing warps with a steel hammer can quickly ruin your piece through work hardening, cracking, and deep surface scratches. A rawhide mallet is the ultimate solution—allowing you to flatten and restore metal efficiently without changing its temper or marring its finish. Read on for a step-by-step guide to mastering this essential metalsmithing tool.
I. Why It Works: Rawhide vs. Hard Metals
To understand why this soft-face tool is so effective, it helps to look at how force transfers during a strike:
- Steel Hammer (Hard Impact): Force is concentrated on a single, rigid point of contact. This instantly compresses the metal's internal molecular structure, creating severe dislocation in the microscopic crystal lattice. The result is immediate work hardening, localized thinning, and deep surface scratches.
- Rawhide Mallet (Soft/Yielding Impact): Rolled-hide structures offer cushioning elasticity. Upon impact, the striking face deforms slightly, expanding the contact area instantly and distributing the kinetic force evenly across the surface.
Because a rawhide mallet absorbs peak impact, it delivers just enough force to push bends and warps flat without stressing the metal. As a result, the material remains soft, pliable, and workable throughout the process—allowing you to safely skip time-consuming annealing heat treatments.
II. Essential Workshop Setup Before You Start

A tool is only as good as the surface beneath it. Before striking your first piece of sheet metal or wire, set up your bench correctly:
- Choosing a Base (Bench Block): A rawhide mallet must be used in conjunction with a flat steel bench block or a dense block of high-density hardwood. If your base has dips, scratches, or uneven spots, it is impossible to achieve a flat finish on your workpiece.
- Checking the Mallet Head: The rawhide face must be smooth, clean, and free of debris. If the head has deep gouges, sharp edges, or frayed leather fibers, sand it smooth with fine-grain sandpaper first to prevent these imperfections from transferring onto your metal.
- Cleaning the Metal Surface: Before hammering, wipe away any dust, polishing compound, or metal filings from both the metal and the bench block. Trapped particles act like sandpaper grit when struck, pressing directly into the metal surface.
III. Step-by-Step Guide: How to Flatten Sheet Metal and Wire

Scenario A: Flattening Sheet Metal
- Locate the Warp: Place the metal sheet on your steel anvil or bench block. Press down gently on the edges and corners with your fingers to identify the high points, twists, or warped zones.
- Flat Strike Technique: Generate force from your wrist rather than your shoulder. Ensure the entire flat face of the mallet strikes the metal completely parallel to the surface; never tilt the tool or hit with the sharp rim of the head.
- Center-Out Sequence: Begin hammering at the center of the warp and work outward toward the edges in a spiral or radial pattern. This systematic progression drives out internal tension without trapping pockets of distortion.
- Flip and Repeat: After working the top side, flip the metal sheet over and give it a few light, even strikes on the reverse side. This balances the remaining internal stress across both surfaces of the sheet.

Scenario B: Straightening and Flattening Wire
- Straighten and Lay Flat: Place the bent or coiled wire (such as sterling silver, brass, or copper wire) flat across the center of your bench block.
- Roll and Strike Method: Gently and continuously strike the wire with your mallet while evenly rolling the wire back and forth with your non-dominant fingers. This 360-degree rotation distributes every strike across the entire circumference, straightening the wire without flattening it into a tape shape.
IV. Critical Rules: How to Avoid Accidental Work-Hardening

While a rawhide head is far more forgiving than steel, poor technique can still ruin your stock. Follow these core guidelines:
- Avoid Blind, Repeated Heavy Strikes on a Single Spot: Repeatedly hammering the exact same spot dozens of times—even with a soft mallet—will eventually cause localized stress accumulation and stubborn hardening.
- Control Strike Force (Medium, Consistent Strikes): Move the metal into place using a steady rhythm and moderate force. Let the weight of the mallet head do the work rather than attempting to flatten a heavy warp with a single, massive blow.
- Distinguish Tool Purposes: If a piece of metal is too thick or heavily alloyed for the mallet to move effectively, step back and evaluate whether annealing or a heavier wood mallet is required, rather than simply hitting harder.
V. Common Troubleshooting: What If the Metal Is Still Warped?
If your sheet or wire refuses to lie completely flat, review these common workshop issues:
-
Issue 1: The metal remains warped after hammering.
- Cause: You only hammered the high spot without working outward to release edge tension; or the underlying steel block is bowed.
-
Issue 2: Tiny dents or ring marks appear on the metal surface.
- Cause: The mallet struck at an angle, making contact with the hard outer rim instead of the flat face; or metal chips were left on the bench block.
-
Issue 3: The metal still became hard and springy.
- Cause: Striking frequency was too rapid and heavy, or the metal was already work-hardened from previous rolling or drawing processes before you started flattening it.
-
Issue 4: The metal curls upward at the corners as you hammer.
- Cause: Working from the outer edges inward toward the middle traps stress in the center of the sheet. Always work from the center outward to push the stress off the edges of the plate.
-
Issue 5: The wire becomes oval-shaped or flattened instead of round.
- Cause: Strikes were delivered too hard without rolling the wire fast enough between blows. Reduce your striking force and maintain a continuous, fluid rotation of the wire.
Conclusion
Mastering the use of a rawhide mallet comes down to three fundamental practices: striking completely parallel to your work surface, systematically hammering from the center outward, and maintaining a relaxed, moderate rhythm. When paired with a polished steel bench block, this classic workshop tool allows you to flatten metal, straighten wire, and correct structural distortions while preserving the original temper and finish of your material.
If you are looking to upgrade your studio setup with reliable, professional-grade metalsmithing equipment, explore our selection at LuxgoldTools. From precision-wrapped rawhide mallets to mirror-polished steel bench blocks, we supply the durable bench tools you need to achieve clean, flawless results in every project.
