
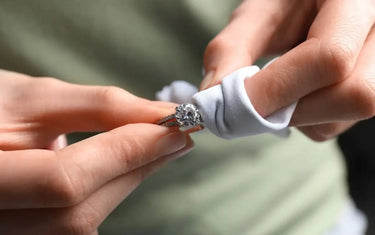
That dull black film on your silver isn't dirt—it’s natural oxidation. While a reusable silver polishing cloth is the safest way to restore its shine, common mistakes like washing the cloth or scrubbing too hard can ruin both the fabric and your jewelry. Here is how to master the two-layer polishing technique to bring back a true mirror luster safely at home.
I. What Makes a Reusable Silver Polishing Cloth Work?

A professional jeweler's polishing cloth is not a standard microfiber rag. It functions through a combination of chemical breakdown and multi-stage physical finishing, allowing it to strip tarnish without stripping the underlying precious metal.
Chemical Action: Micro-Abrasives and Anti-Tarnish Formulations
The cloth fibers are impregnated with ultra-fine, micron-grade polishing compounds paired with specialized chemical cleaning agents. As you apply friction to the metal, these agents dissolve and shear away the stubborn silver sulfide layer at the microscopic level without gouging the softer pure silver beneath. At the same time, the formulation leaves behind an invisible, microscopic barrier that seals the freshly exposed silver against airborne moisture and sulfur, noticeably delaying future tarnishing.
Physical Design: How the 2-Ply Layering System Cleans and Buffs
Professional cloths separate the heavy cleaning stage from the final finishing stage using an integrated two-layer structure:
- The Inner Layer (White or Light-Colored): This is the active cleaning stage. Impregnated with the chemical formula and micro-abrasives, it directly contacts the metal to lift heavy oxidation, stubborn dark spots, and dull surface build-up.
- The Outer Layer (Dark-Colored or Plush Flannel): This is the finishing and buffering stage. Untreated with chemicals, it traps and wipes away loosened chemical dust and loosened metal oxides, burnishing the silver to a crisp, streak-free mirror shine.
II. Step-by-Step: How to Polish Silver Properly
Polishing silver is as much about physical control as it is about chemical action. Because sterling silver (925) is a ductile, relatively soft precious metal (ranking only 2.5 to 3 on the Mohs hardness scale), applying uncontrolled pressure can warp delicate bands or snap fine chain links. Follow this professional four-stage protocol to safely maximize cleaning efficiency.

Step 1: Prep the Jewelry (Pre-Cleaning and Dust Removal)
Never rub a dry, dusty piece of jewelry directly with a polishing cloth. Household dust contains ambient quartz and silica particles with a Mohs hardness of 7, which will easily gouge sterling silver and create fine hairline swirls.
- Degrease & Rinse: Soak the piece for 60 seconds in lukewarm water mixed with a drop of mild, lotion-free dish soap to break down body oils, cosmetic residues, and loose grit.
- 100% Moisture Check: Pat thoroughly dry with a lint-free microfiber towel and allow all crevices to air-dry completely. Any trapped water will dilute the dry chemical polish inside the inner cloth, drastically reducing its tarnish-lifting performance.

Step 2: Clean with the Inner Cloth (Targeted Oxidation Removal)
Unfold the cloth to expose the chemically treated white layer. Never grip jewelry mid-air without backing support, as thin shanks can easily deform under thumb pressure.
- Flat & Curved Bands (Rings and Bangles): Wrap the treated cloth firmly over your thumb. Support the back of the metal with your index finger to reinforce the band. Rub along the metal’s contour using straight, back-and-forth linear strokes rather than erratic circular motions.
- Chains & Delicate Links: Never pull a necklace or bracelet through a pinched cloth, as the tensile strain will stretch links or snap solder joints. Instead, lay the chain flat across your palm, sandwich it gently with the inner cloth, and polish in short 2-inch increments.
- Prong & Gemstone Settings: When working near stone mounts, stroke outward away from the prongs. This prevents the cloth fibers from catching on the metal tips and pulling prongs loose.
- Rotate Contact Zones: Once a section of the cloth turns black, shift your grip to a fresh, white portion of the inner layer to maintain maximum chemical cutting efficiency.

Step 3: Buff with the Outer Cloth (Restoring Mirror Shine)
Once the black silver sulfide has fully lifted, fold the cloth over to utilize the untreated, plush outer layer.
- Feather-Light Friction: Apply rapid, light-pressure buffing across the entire piece. The plush weave picks up loosened chemical residue and loose metal oxides without scratching the newly exposed silver.
- 45-Degree Light Inspection: Hold the piece under direct, focused light at a 45-degree angle to verify that cloudy oxidation halos have transitioned into a crisp, uniform specular reflection.
Step 4: Wash Hands and Store Correctly
- Skin Rinse: Loosened silver sulfides and dry chemical binders will transfer to your fingertips during use. Wash your hands thoroughly with warm water and soap after cleaning.
- Hermetic Storage: Return the reusable cloth immediately to an airtight storage sleeve (such as a zip-top pouch). Unprotected exposure to open air causes the embedded anti-tarnish inhibitors to dry out and pick up ambient workshop dust.
III. Dos and Don'ts of Using a Silver Polishing Cloth
To protect both your jewelry collection and your cleaning tools, keep these rules in mind:
|
Category |
Best Practices (Dos) |
Critical Mistakes (Don'ts) |
|
Motion & Technique |
Do wipe gently in a consistent, single back-and-forth direction along the metal's contours. |
Don't rub in random, high-pressure circles that can trap micro-debris and cause swirl marks. |
|
Cloth Care |
Do continue using the cloth even when it turns completely black with residue. |
Don't ever wash the cloth with water. Laundering dissolves the embedded polishing agents, rendering it useless. |
|
Plated Metals |
Do use minimal pressure on heavy gold vermeil only when strictly necessary. |
Don't scrub thin flash-plated silver or gold-plated pieces; friction will strip the microscopic plating layer. |
|
Gemstones |
Do work carefully around secure prong settings holding hard stones (diamonds, sapphires). |
Don't allow treated cloth fibers to touch soft, porous, or organic stones like pearls, opals, or turquoise. |
|
Special Finishes |
Do polish high-polish, smooth metal surfaces exclusively. |
Don't use on oxidized/antiqued silver recesses (it strips intentional patina) or satin/frosted finishes. |
IV. When to Replace Your Reusable Polishing Cloth?
Because these cloths are designed for repeated use, you do not need to replace them simply because they look dirty. The black marks are an expected byproduct of the chemical reaction with silver sulfide.
Signs It Is Time for a Replacement
You should replace your polishing cloth when:
1. The fabric turns entirely dark gray or black on both the inner and outer contact zones.
2. The fibers become stiff, dry, or frayed, failing to grip the metal surface properly.
3. Repeated rubbing no longer restores shine, indicating that the active polishing compounds and anti-tarnish chemicals have been depleted.
Estimated Lifespan
For average home jewelry owners maintaining a personal collection of 5 to 10 pieces, a quality 2-ply silver polishing cloth typically lasts between 6 months and a full year. Professional bench jewelers and retail staff handling daily inventory may need to replace their cloths every few weeks to maintain peak efficiency.
Frequently Asked Questions
Q1: Can I use a silver polishing cloth on gold or brass?
A: Yes. It safely polishes solid gold, platinum, and brass. However, use extreme gentleness on gold-plated pieces to avoid rubbing through the thin plated layer.
Q2: Why does the cloth turn black immediately?
A: This is a normal chemical reaction as the active formula breaks down and lifts the silver tarnish (Ag2S). The cloth is not "dirty"—never wash it; just keep using it.
Q3: What if my silver is too oxidized to clean with a cloth alone?
A: For heavy, encrusted tarnish, soak the piece briefly in a mild silver cleaning solution or ultrasonic bath first, then finish with the polishing cloth for the final mirror shine.
Keeping Your Silver Brilliant
Maintaining fine jewelry does not require complicated machinery or harsh chemical treatments. By sticking to four fundamentals—never washing the fabric, utilizing the 2-ply system correctly, wiping with straight linear strokes, and storing the cloth in an airtight pouch—you can keep your silver gleaming while extending the working life of your tools.
For reliable workshop supplies and professional 2-ply silver polishing cloths, explore the jewelry care collection at LuxgoldTools. Equipping your bench with trade-tested reusable silver polishing cloths and precision cleaning accessories ensures your fine jewelry always maintains its showroom luster.
