
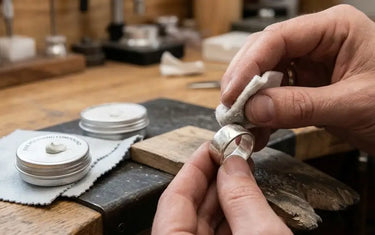
Surface scratches on fine jewelry dull reflective luster, turning high-polish pieces cloudy over time. Using the right jewelry polishing compound restores that deep factory shine by leveling uneven metal micro-grooves. With the correct setup, abrasives, and technique, you can safely erase unsightly blemishes at your workbench without rounding crisp edges or damaging precious stones.
I. Quick Diagnosis: Assessing Scratches and Feasibility
Before charging a buffing wheel, determine whether the blemish requires a simple buff or mechanical stock removal. Polishing compound smooths metal surfaces, but it does not "fill in" physical voids.

The Fingernail Test
Run your thumbnail across the scratch under bright bench lighting:
- Light Swirls and Hairline Scratches: If your nail glides across the metal without catching, you have superficial surface swirls. Polishing compound alone will buff these out smoothly.
- Moderate to Deep Scratches: If your fingernail catches, drops, or clicks against the groove, the gouge is too deep for buffing compound alone. Attempting to buff this out will dish the surrounding metal and blur fine details. Pre-treat deep damage using stepped abrasive paper (such as 400 to 1200 grit) or micro-abrasive wheels before reaching for your compounds.
Safety Warning: High-Risk Areas
Take caution before applying abrasive friction to certain metals and mountings:
- Plated and Vermeil Items: Gold-plated or vermeil layers measure only a fraction of a micron to a few microns thick. Standard cutting abrasives quickly strip this thin skin, exposing the dull brass or silver base metal underneath. Limit these pieces to non-abrasive hand cleaning.
- Vulnerable and Porous Gemstones: Never let rotating buffing wheels touch organic or fracture-prone gems. Pearls, opals, turquoise, lapis lazuli, and oiled emeralds will pit, discolor, or crack under abrasive heat and chemical binders. Mask these stones securely with thermal jewelry tape or remove them entirely prior to refinishing.
II. Checklist of Tools and Supplies
Assemble these bench supplies before starting to prevent cross-contamination and protect your workspace.

-
Abrasive and Polishing Compounds:
- Coarse cutting compound (to blend out surface scratches)
- Fine finishing/mirror-finish compound (to develop high luster)
-
Buffing Wheels:
- Hard felt bobs or tightly stitched muslin cloth wheels for coarse cut-down stages
- Loose-leaf flannel or soft unstitched cotton wheels for final finishing
-
Rotary Equipment:
- Flexible shaft machine, high-torque micro-motor, or dedicated bench polisher
- Premium microfiber cloth (if performing light touch-ups by hand)
-
Cleaning and Workshop Protection:
- Lukewarm ultrasonic solution, mild degreasing dish soap, and warm water
- Soft-bristled nylon toothbrush
- Impact-resistant safety glasses and a fitted particulate dust mask (N95 or higher)
III. Quick Wax Selection Guide: Matching Metal Types with Compounds
Different precious and base alloys require distinct abrasive grit sizes and carrier binders. Use this matrix to match your metal to the correct compound and wheel pairing:
|
Metal Type |
Step 1: Pre-Polish / Cut |
Step 2: Final Polish / Lustre |
Recommended Buffing Wheel Pairing |
|
Gold / Karat Gold |
Brown Tripoli |
Red Rouge or Ultra-Fine High-Gloss Compound |
Stitched Muslin Wheel $\rightarrow$ Soft Unstitched Cotton Wheel |
|
925 Sterling Silver |
White / Grey / Brown Cutting Compound |
Red Rouge or Silver-Specific Fine Compound |
Medium Felt Bob $\rightarrow$ Loose Flannel Wheel |
|
Platinum / Titanium |
White Aluminum Oxide Compound |
Green Chromium Oxide or Platinum Lustre Bar |
Hard Stitched Wheel $\rightarrow$ Fine Flannel Buff |
|
Brass / Bronze |
Brown Tripoli |
Green Stainless/Metal Compound or Fine White Bar |
Hard Felt Bob $\rightarrow$ Soft Cotton Wheel |
IV. Six-Step Practical Method: Standardized Scratch Removal Process
Executing a scratch repair requires a controlled, incremental approach. Follow this shop-tested bench workflow to eliminate surface scratches while preserving geometric crispness and original contours.
Step 1: Pre-Cleaning & Surface Preparation

Wash the jewelry piece thoroughly before bringing it anywhere near an abrasive wheel. Use warm, soapy water and a soft-bristled brush to dissolve oils, hand lotions, polishing paste residue, and airborne grit.
If you polish a piece carrying loose microscopic dirt, the rotating wheel traps those hard contaminants against the soft gold or silver, carving fresh micro-grooves into the workpiece. Once washed, dry the piece thoroughly with a clean lint-free cloth so moisture does not splash or alter the consistency of the wax binder.
Step 2: Applying Compound to the Wheel (Charging the Buff)

Mount your cutting buff—such as a firm felt bob or stitched cotton wheel—onto the tapered spindle or mandrel. Start the motor and allow the arbor to reach steady working speed.
Lightly touch the edge of your cutting compound bar against the spinning perimeter of the wheel for just 1 to 2 seconds. You only need a thin, uniform transfer of abrasive binder across the fiber tips.
Pro Tip: Less is always more. Overloading the wheel creates a thick, gummy black crust that smears across the metal, generates excess drag, and insulates the abrasive grains from doing their job. If the wheel looks heavily caked or feels slick, dress it clean with a buff rake before continuing.
Step 3: Cutting and Scratch Removal (The Pre-Polish Stage)

Set your rotary tool or flex shaft to a steady medium speed (typically 3,000 to 5,000 RPM). Bring the metal into contact with the lower quadrant of the wheel, moving the piece steadily across the rotation so the wheel spins off the edge rather than catching it.
Use a deliberate cross-hatch motion, polishing across the scratch at an angle (roughly 45 degrees), then turning the piece 90 degrees to cut across your previous pass. This cross-directional sweep prevents directional channeling and helps you monitor exactly when the scratch shoulders flatten out.
Keep the piece in constant motion. Never dwell in one spot, which creates visible hollows, rounds off crisp edges, or generates friction heat that can degrade soldered joints. Continue until the original scratch completely blends into a uniform, satin-smooth micro-finish.
Step 4: Inter-Stage Cleaning (Preventing Cross-Contamination)

Before moving to your high-luster compound, stop and clean both the piece and your hands completely. Wipe away greasy compound films with a clean micro-fiber cloth, or soak the item briefly in warm water with a degreasing detergent to strip away trapped carrier wax.
Inspect the metal under bright magnification (such as a 10x loupe) to ensure all scratch lines are gone.
Crucial Bench Rule: Never reuse the same buffing wheel for both cutting and final polishing. A wheel charged with coarse Tripoli holds aggressive particles inside its fibers; applying fine rouge over that same wheel introduces coarse grit into your finishing pass, leaving perpetual hazy micro-swirls.
Step 5: Final Buffing (High Lustre & Mirror Finish)

Switch to a brand-new, clean, loose-leaf flannel or soft cotton wheel designated strictly for your final compound (such as jewelers rouge or an ultra-fine finishing bar). Spin the machine up and charge the wheel with a single, gentle 1-second touch of the bar.
Hold the jewelry with a light, confident grip. Use feathered, rapid sweeping strokes across the metal surface, letting the peripheral speed of the wheel do the work.
Apply barely enough contact pressure to maintain smooth surface connection—aggressive force at this stage causes drag lines, burns the binder onto the metal, and rounds prong tips. In just a few sweeping passes, the satin surface will transform into a deep, crystal-clear mirror reflection.
Step 6: Post-Cleaning, Degreasing & Drying

Polishing compounds contain dense animal or synthetic grease binders that lodge securely into crevices, under bezels, and behind stone settings. Submerge the piece in an ultrasonic cleaner filled with warm degreasing detergent solution, or soak it in a warm bath of water and grease-cutting dish soap for 3 to 5 minutes.
Gently work a soft-bristled toothbrush around gallery wires, prong roots, and inside the ring shank to lift all emulsified wax. Rinse thoroughly under running lukewarm water to wash away loose particles, then pat dry with a fresh, lint-free microfiber towel. Finish by blowing dry with warm air to ensure no moisture remains behind stone mountings.
V. Must-Read for Beginners: 5 Common Mistakes to Avoid
1. Cross-Contaminating Buffing Wheels
Dedicate one wheel exclusively to one grade of compound. Label your buffs with a marker on the hub. Loading rouge onto a wheel previously soaked in coarse Tripoli leaves permanent micro-haze over the final surface.
2. Applying Excessive Pressure
Abrasive cutting requires surface speed and consistent fiber contact, not brute force. Jamming the jewelry hard into the wheel stalls your motor, builds up friction heat, and risks snatching delicate items right out of your fingers.
3. Running at Excessive Speeds
Spinning wheels at excessive RPM burns off the wax binder instantly, throwing dry dust into the air rather than polishing the workpiece. Excessive speed heats rings quickly, weakening bezel settings and loosening heat-sensitive jewelry epoxies.
4. Rounding Crisp Corners and Hallmarks
Avoid rolling soft wheels over crisp geometric facets, channel walls, or stamped maker marks. Soft buffs wrap around sharp profiles and soften them into mushy edges. Use firm felt bobs held parallel to structural planes to preserve crisp angles.
5. Letting Abrasive Binders Harden in Recesses
The grease binders in polishing compounds stiffen as they cool. Clean your finished pieces while they remain slightly warm from the bench operation; once dried, compound hardens like cement inside decorative scrollwork.
VI. Conclusion
Restoring scratched metal relies on dependable preparation, correct wheel selection, and applying steady, measured passes through matching abrasive grits. Setting up a dedicated bench progression makes it easy to take weathered rings, pendants, and bracelets from dull, scuffed metal back to a flawless, high-contrast mirror shine.
When you are ready to upgrade your workshop with professional cutting waxes, mirror-finishing bars, and high-performance abrasive bars, explore the complete range of premium jewelry polishing compounds available at LuxgoldTools.
